
You’ve probably used immersion blenders for blending smoothies and soups. But you know, can? You can use an immersion blender to mix cake batter.
I’m a kitchen specialist with years of experience cooking. I’ve explored many tools and techniques for baking. A lot of the time, I used an immersion mixer to make Cake. In this guide, I will share the seven best ways to Mix Cake using Immersion Blender.
Stand mixers and hand mixers are traditional choices for the cake batter. Immersion blenders offer a convenient alternative. They’re handy for smaller batches or kitchens with limited space.
Immersion blenders are convenient and multi-purpose. I have some tips and tricks for using one to mix cake batter. It ensures you end up with a light and fluffy result.
So, I’m here to share my expertise and help you navigate the exciting world of baking and cooking. Let’s go to start.
Can I use An Immersion Blender Instead of a Mixer?
As a kitchen specialist, I frequently get asked if an immersion blender can be used instead of a stand mixer for cake batter. In my experience, the answer is yes, with a few caveats.
An immersion, hand blender can work great for mixing cake batter. I’ve often used mine to quickly blend wet and dry ingredients into a smooth, lump-free batter. The trick is not to overmix, or your cake can become dense. With an immersion blender, it only takes a few quick pulses. It usually takes around 5-10 seconds to incorporate the ingredients thoroughly. Be careful not to splatter batter all over the sides of the bowl.
One downside is that most immersion blenders must be more powerful for heavy-duty cake recipes. For example, genoise sponge and angel food cake. For fluffier cakes, a stand mixer is still your best bet. Immersion blenders also can’t handle mixing in chunks.
An immersion blender may be better for recipes that add flour, sugar, or liquids. It can be challenging to add ingredients while blending at the same time. A stand mixer with a paddle attachment is better suited for recipes with added ingredients.
In the end, for a simple cake like vanilla, carrot, or banana bread, an immersion blender will work great and save you time cleaning up a stand mixer. But stick with the tried-and-true stand mixer when a recipe requires precision or power. With the right tools and techniques, you’ll be whipping up perfect cakes in no time!
How to Use an Immersion Blender to Mix Cake Batter

An immersion, hand, is ideal for mixing cake batter. It’s lightweight, compact, and easy to maneuver. Unlike a stand mixer, there’s no need to lug out a heavy appliance and attachment. You can plunge the immersion blender into your mixing bowl and work.
First, ensure you have all your ingredients in the mixing bowl. Then, submerge about two-thirds of the immersion blender into the batter. Could you turn it on? Move it around using a gentle up-and-down motion. Stop when the ingredients start to come together. Be careful not to splash batter outside the bowl.
Once the batter is combined, pulse the immersion blender on and off. Move it around the bowl. It ensures even mixing. Stop blending once there are no streaks of flour or lumps remaining. Over-mixing can make cakes challenging, so take care not to overblend.
An immersion blender works for mixing cake batters. Keep a spatula on hand if you need to scrape down the sides of the bowl. Be cautious when blending batter with pieces like chocolate chips. The immersion blender can break them apart.
With some practice, you’ll be whipping up cake batters in no time using your immersion blender. Your cakes will come out light and fluffy, and you’ll avoid the hassle of lugging out the stand mixer.
7 Easy Ways to Mix a Cake Batter With An Immersion Blender
As a kitchen specialist, I use my immersion blender to mix cake batter quickly. Here are seven easy ways I’ve found to mix cake batter with an immersion blender:
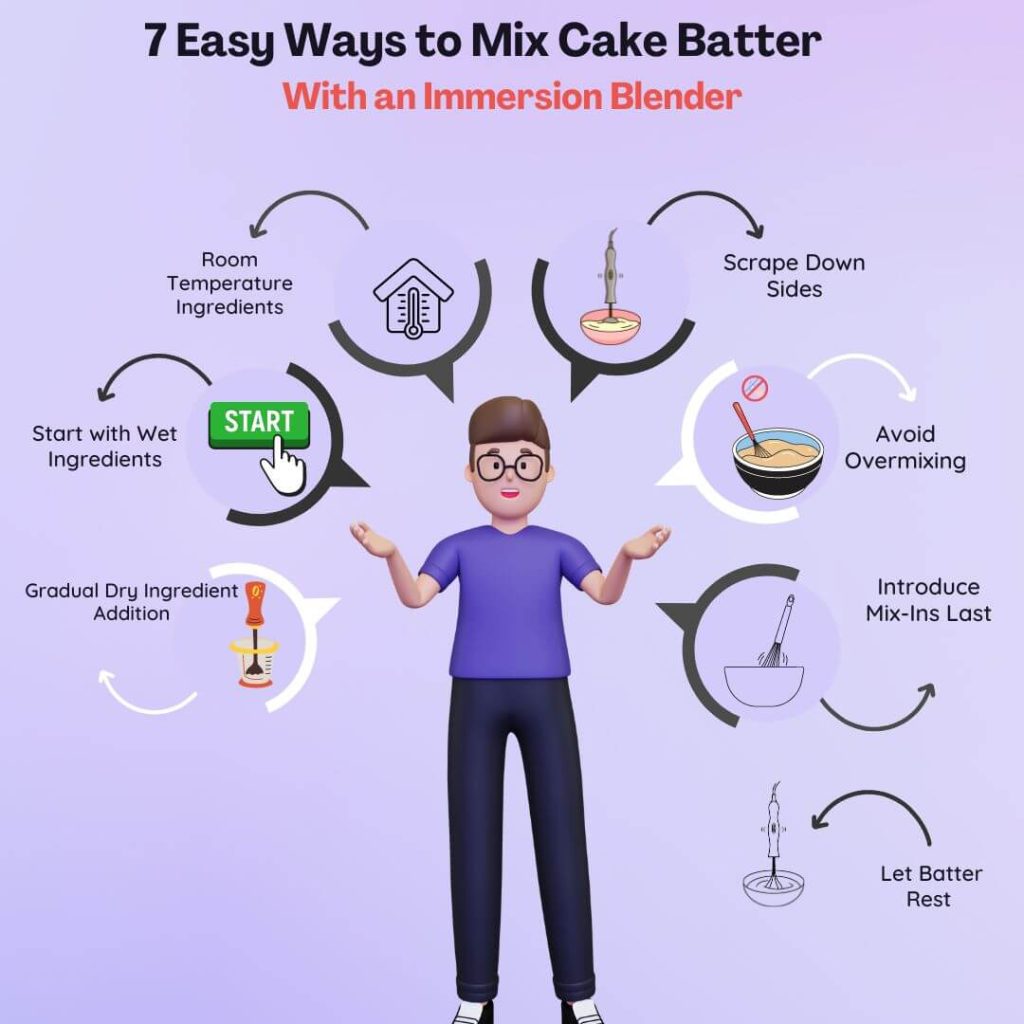
1. Make sure all ingredients are at room temperature
Before starting, take the eggs, butter, and milk out of the fridge to come to room temperature. It will ensure the ingredients blend smoothly.
2. Add the wet ingredients first
I first add the wet ingredients – eggs, oil or melted butter, milk, and flavorings like vanilla extract – to the bowl. Then, I use the immersion blender to combine them thoroughly. It creates a homogeneous base for adding the dry ingredients.
3. Add the dry ingredients in stages
Next, I add the dry ingredients – flour, sugar, baking powder, and salt in stages, blending after each addition. Adding them gradually prevents lumps from forming. I start with about 1/3 of the dry ingredients, mix, then add the next 1/3, blend again, and finish with the remaining amount.
4. Scrape down the sides as needed
While blending, I stop periodically to scrape down the sides of the bowl with a spatula, ensuring all ingredients get incorporated. It helps achieve an even, lump-free batter.
5. Do not overmix
Keep the batter the same, or the cake can become challenging. Stop mixing when the dry ingredients are blended in and the batter is smooth. Overmixing can overdevelop the gluten in the flour, leading to a dense cake.
6. Add mix-ins at the end
If adding mix-ins like chocolate chips or fruit, fold them with a spatula after blending the wet and dry ingredients. The immersion blender can crush some mix-ins, so folding them in by hand is best.
7. Let the batter rest
For the lightest, fluffiest cake, let the batter rest for 30 minutes before baking. It allows the flour to hydrate and the leavening to activate, producing the most rise. Then bake as directed!
Using these tips, you’ll be whipping up light and airy cake batters in no time with your immersion blender. Let me know if you have any other questions!
Immersion Blender Tips and Tricks for Perfect Cake Batter
I’ve picked up a few tricks over the years. I use an immersion blender to mix the cake batter.
Here are some of my top tips:
Start with the wet ingredients
When making cake batter, I always blend the wet ingredients. These include eggs, oil, milk, and vanilla or almond extract flavorings. First, blend these to ensure they are well combined. Then, add the dry ingredients.
Add dry ingredients gradually
Once the wet ingredients are smooth, I add the dry ingredients – flour, sugar, baking powder, and salt – one cup at a time. Adding them slowly while blending prevents clumps from forming. I usually add about 1/3 to 1/2 of the total dry ingredients. Then, I agree. After that, I add more and repeat until everything is incorporated.
Scrape down the sides
Be sure to stop blending periodically to scrape down the sides of the bowl with a spatula. The immersion blender can easily reach ingredients stuck to the bowl’s sides. So, scraping them down ensures all ingredients get thoroughly mixed in.
Don’t overmix
While blending the batter, be very careful not to overmix. Blend just until the ingredients come together, and the batter is smooth. Overmixing can lead to a tough cake. As soon as the batter comes together, stop blending. It’s better to undermix slightly than overmix.
Add mix-ins at the end
If adding mix-ins like chocolate chips or fruit, fold them in with a spatula after blending the batter. Adding them while mixing can cause them to break down or get overmixed into the batter. Gently folding them in at the end ensures they remain intact.
Using these tips will help you make light and airy cake batter in no time using your immersion blender.
Frequently Answer Questions(FAQs)
Can You Cream Butter With An Immersion Blender?
Absolutely! An immersion blender works great for creaming butter. The key is to use cold butter to help it cream evenly. Just cut the butter into cubes and add them to a large bowl. Then, use the immersion blender to blend the butter until it’s smooth and creamy.
Is An Immersion Blender Good For Whipping Cream?
You sure can! At home, people usually whip cream using an electric mixer. However, an immersion blender also works well for this task. It may take slightly longer than a stand mixer, but you can still get good results.
Do Immersion Blenders Work For Milkshakes?
Yes, indeed, immersion blenders are perfect for blending up milkshakes! Add your ingredients. The immersion blender blends everything into a smooth shake. You don’t need a ton of liquid either, which lets you make them thicker and more flavorful. Add more ice cream or frozen fruit if you want an extra thick shake.
Is An Immersion Blender The Same As A Food Processor?
It’s no different, but an immersion blender can do a similar job sometimes. Both are used to blend and puree ingredients. A food processor has extra attachments. These attachments let
Final Thought
You chop, slice, and grate things. A food processor is more versatile. An immersion blender is more straightforward but still blends well.
That’s the scoop on using an immersion blender for mixing cake batter. As you can see, while it takes some finesse, an immersion blender can finish the job and save you time in the kitchen.
Just be careful not to overmix the batter. Start at a lower speed and slowly increase. Ensure all ingredients are distributed before pouring the batter into your cake pans.
With some practice, you’ll be whipping up perfect cake batters in no time. Let me know if you have questions about immersion blender techniques or recipes. I’m happy to share more of my kitchen adventures and expertise.
xvideos,
porn,
hentai,
porn,
xnxx,
sex việt,
Phim sex,
mp3 download,
MÚSIC MP3,
Define Npv,
hentai,
free porn xx,
Tom Life Insurance Review,
Is It Better To Pay Credit Card Before Statement,
Anime xxx,
phim xxx,
Free MP3,
phim xnxx,
Chinese Sex,
phim xxx,
xtube,
Ncl Trip Insurance,
gay brasileiro xxx,
sex,
BR sex,
xxx,
How Does Apple Music Voice Work,
Jav hd,
December In Washington Dc,
black horny old man eat pussy,
sexo forte,
Hot Topic Canada,
Craigslist Search All,
Hentai haven,
sex,

Tammy E. Edison is a distinguished specialist in the world of kitchen appliances, and she is proud to be a part of the dynamic team at kitchenusers.com. With a background in engineering and a passion for culinary innovation, Tammy E. Edison has established herself as a go-to expert for all things related to kitchen appliances technology.
4 thoughts on “Can You Use an Immersion Blender to Mix Cake Batter – Best Guide”